New Posts

Monday, March 21, 2016

Apple's Special Event March 21, 2016 Overview

Apple revealed 4 things in their Special Event today March 21 2016.

  • The new 4" iPhone.
  • The new 9 inch iPad Pro
  • The iOS 9.3 update
  • Research Kit & CareKit

The 4" iPhone SE

Sporting the same outer casing and design as its predecessors, the iPhone 5 and 5s, the iPhone SE not only drops the "5" numeral it also brings iPhone 6s and 6s Plus features to the 4" screen size.

Updated with the new A9 chip from its older siblings, the now simply titled iPhone SE gets the processing power to run the updated iSight Camera, and video processing required with it. It basically brings the power and features of the larger iPhones to the smaller screen size.

iOS

All in all a welcome update, and expected one, since Apple has been touting a 5 iPhone lineup since the release of the iPhone 6s and 6S plus last September. If you were put off by the larger screen, this is your chance to get the smaller version, with the smaller price tag, but with the same power and features as the larger offerings

The 9" iPad Pro

Since the iPad Air 2 did not get an update last September in favor of the iPad Pro release, it was pretty much called at that time that it would see an update mid cycle. The 9" iPad Pro as its being called, is now the 7th generation iPad released by Apple in the 9" format.

It features the same Apple Pencil supporting screen technology as its larger sibling, and gets some extra updates. Mainly the new 12MP iSight Camera available on the iPhone 6s and 6s Plus along with a 5MP front facing Facetime camera. It also gets True Tone Flash and Live Picture support which its larger sibling lacks.

The 9" iPad Pro also debuts a new storage size offering with its 256GB version. The 256GB option will also be available in future 12" iPad Pros

Overall an expected update to the 9" lineup. However it leaves some iPad Pro adopters a little miffed, by the extra features not available in the larger more expensive version that now seems slightly outdated with only 6 months in its life span.

iOS 9.3 & CareKIt

iOS 9.3 brings a few new features, and updates to existing ones. Things like Health, and CarPlay get your standard updates. While Notes receives a new security feature which lets you password / Touch ID protect your Notes.

The new update also brings with it Night Shift, which makes the screen light warmer instead of the colder blue light it normally has, for night usage that may help you sleep better.

The update also brings with it new tools to manage iPads in classrooms, and new ways for Teachers and students to interact through their iPads.

iOS 9.3 also brings with it CareKit and ResearchKit, two new frameworks for App developers to help Doctors and care givers more easily track their patients care and status. Along with HealthKit they provide a wealth of information on the patient's health.

Overall a couple of key updates, but nothing really earth shattering in terms of new features. It was not as exciting as there usual September Keynotes, and the reveals were pretty much called since last year, so nothing that we did not expect already

Links

9" iPad Pro

http://www.apple.com/ipad-pro/

iPhone SE

http://www.apple.com/iphone-se/

iOS 9.3

http://www.apple.com/ios/updates/

Wednesday, February 17, 2016

FBI Requests Apple bypass the security of iOS to unlock iPhone used by San Bernardino shooters.

Apple is currently in a standoff with the FBI regarding an iPhone that was used by one of the perpetrators of the San Bernardino shootings last year.

The FBI is requesting Apple create a version of iOS, the operating system that runs on iPhones and iPads, that would allow them to unlock the iPhone recovered during the course of the investigation to gain access to the data, photos and files within it.

Tim Cook has been adamant that doing this would undermine the security that Apple has been striving for in their operating system for the last 9 years. The FBI is requesting that Apple endanger the privacy of every iPhone user in the world.

iOS by its very nature and design is a highly secure operating system that makes it virtually impossible to access the information on an iPhone or iPad without the passcode. iOS encrypts the data on the iPhone so that it cannot be recovered by normal means without introducing the passcode.

More so, introducing wrong passcodes will disable the iPhone after several attempts for a period of time. After which you can then attempt to enter a passcode again. Subsequent failed attempts increase the amount of time one needs to wait between attempts.

The FBI is requesting Apple create a version of iOS where this would not happen and they can brute force (try passcodes continuously, without stopping) the passcode entry until they find the correct one.

This event will undoubtedly set a precedent for IT legislature in the future.

Tim Cooks letter to Apple Customers: http://www.apple.com/customer-letter/

iOS May 1970 Date Issue.

Public Service Announcement

It seems recently, a practical joke or attempt at humor has been circulating in social media where by an unsuspecting user is asked to set the date on their iPhone or iPad or iPod Touch back to May 1970 and in so doing the iPhone will obtain a general look and feel of the iOS 6 and below. A retro look if you will. This unfortunately is not the case, and many users have been left with non functional iPhones.

The iPhone will not respond to touch or any of the customary steps including resetting or restoring the i Device to factory condition.

Why this happens is still a bit of a mystery. January 1st 1970, is the moment in time where the Unix Epoch begins. The Unix Epoch is a mechanism that all computers and devices in the world use to handle time and dates. There is no clear reason yet why setting the iPhone, iPad, or iPod touch to this particular date causes them to stop working.

Apple has now made a statement acknowledging this issue, and has stated that it will release an update in the future that will stop the issue from occurring. However it will not fix iPhones already having the problem since while they are in this unresponsive state, there is nothing that can be done to them, so no way to actually apply any update that Apple may release.

Solutions

For now the only solution seems to put the device in DFU mode and restoring the device to factory condition. This however has been hit and miss. Several people report success while several others report failure. Additional info has come to light with this, and it seems if the Restore appears to be stalled at the apple logo and progress bar screen, that it should be left for one to several hours and it will complete. This allows the internal clock to move to a date past January 1st 1970 that the iPhone can work with and completes the restore.

Apple Support - Put Your Device in Recovery Mode.

You can restore it yourself using Apple's instructions in the link provided below, or take it to an Apple Store and have them do it. They will likely do so for free, but make sure to make an appointment before heading out, as Apple Stores are bound to be a little crowded.

Genius Bar Appointment

Restoring the iPhone of course means it will be completely wiped, so if you do not have a backup to restore from, be prepared to loose your info.

Here is Apple's support document acknowledging the issue, and stating an update is in the works: If you changed the date to May 1970 or earlier and can’t restart your iPhone, iPad, or iPod touch - Apple Support

This blog post will be updated when such an update is made available, so stay tuned.

Thursday, December 10, 2015

Apple Pay: How does it work?

What is Apple Pay?
Apple Pay is Apple's foray into the contact-less transaction environment. It uses a special hardware chip most often referred to as an NFC chip, or Near Field Communication chip to effect the transaction.  The main draw of Apple Pay, is that you do not need to give your Bank details, credit card numbers, or any personal info to anyone to make a payment.

Stores that support Apple pay must have an NFC terminal at their checkouts to receive Apple Pay payments.

Setting Up Apple Pay
When you set Apple Pay up, Apple sends, in an encrypted transaction, your Credit Card information to your Bank or Card Issuer and a unique device code it generates from your Device and credit card info for your Bank or Credit card issuer to use.  The Bank or Issuer network then creates a device account number and other payment data, encrypts it so only they can de-crypt it later,  and sends it back to Apple and then your device. Apple cannot decrypt this package, it merely stores it on your device, but nowhere else.

Apple Pay does not store your Credit Card information on your device either, only a portion of your Number is kept so you can identify your card on screen.

You do not need to give your Credit Card information to anyone after this step.   Once your credit card has been set up in Apple Pay and all required information entered into it, it is no longer necessary to give out credit card details or make bank transactions to make purchases through Apple Pay.

Paying with Apple Pay
When you initiate a payment with Apple pay in a store or within an App, Apple Pay will transfer the encrypted package it stored, which does not contain your credit card information, and is encrypted by your Bank or Issuer network, in a transaction with the terminals in stores to confirm payment.   Your Credit Card info is never given out; and best of all cannot be read by any NFC terminal or reader because its not there.

You can also use Apple Pay to pay within Mobile Apps that support it.  These Apps are only running on your device, and again will only send this encrypted package to the merchant and then to your Bank or Issuer network, they do not transfer your credit card or banking details.

After the package has been sent to the terminal or App, the process moves forward like a normal credit card operation would. The bank or issuer is contacted and a request for payment authorization is made. The issuer or Bank de-crypts the data it receives, matches data with their records to find the card being used and okays or denies the purchase.

Your Card details remain with you and your Bank or Credit card issuer.

Payment transactions at stores and within Apps must be authorized by you when requested using your Touch ID, or passcode before the payment package is sent for confirmation. So unless you o.k the operation with your thumb print or passcode nothing is sent from your device.

Availability of Apple Pay
Apple Pay is currently available in the U.S, U.K, and Australia .
UPDATE: It is also available in Canada, but only with direct American Express Cards. Bank issued Amex based cards are not supported yet.
This will be updated when other countries make this process available.

Another thing to keep in mind, is that there is no Website or Transaction Portal for Apple Pay.  All operations happen on your device. That is you cannot go to a Website to use Apple Pay. You need to own a supported device (iPhone 6, 6 Plus, 6s, 6s Plus or iPhones 5, 5s, 5c with an Apple Watch) .

Nobody can request you enter Credit Card details in a website to confirm a payment, and no one can sell you anything through Apple Pay if its not done through your Apple Device.

Stores may request you verify your purchase by signature or other means at time of Purchase.

More information on Apple Pay
You can view stores, and Apps that support Apple Pay, as well as compatible devices on Apple's own Apple Pay page:
https://www.apple.com/apple-pay/

More specifics about Apple Pay security and Privacy of data and personal informaton.
Apple Pay security and privacy overview - Apple Support

Tuesday, December 8, 2015

Top 5 additions in the recently released iOS 9.2 Update for iPhone, iPad and iPod Touch.

iOS 9.2

At the time of writing this, Apple has released the iOS 9.2 Update for all iOS devices that support it. And it comes with a slew of fixes, improvements, and new additions to iOS 9. Here's the Top Five most interesting ones.

  1. New Top Stories section in News

    Available to English speaking countries, the News App features the most relevant stories for your neck of the woods. Now in iOS 9.2 you get a section entirely devoted to the Top News items, whatever those may be. 10 to 1, Donald Trump is there in some form or another.

  2. 3D Touch for iBooks.

    For iBooks users on iPhones 6s and 6s Plus, you can now peek and pop the book's table of contents for a quick preview of the relevant section. As well as your Notes, Bookmarks, and search results. This sounds useful in principle, but lets see how useful it really is in practice to get quick glances at these things.

  3. Apple Music Improvements

    Apple Music has received a ton of criticism over its lacking set of features. Specially when it came to playlists. With iOS 9.2 You can now more easily manage your playlists. Apple has added the ability to create a Playlist directly on your iOS device from a single song via the Add Song to Playlist option. Previously you were limited to existing Playlists, and would have to go out to the Playlist section of the music App to create one before adding songs to it. Apple also added the ability to download an entire playlist for offline listening with single tap, instead having to download each song individually.

    Apple has also added a new indicator for downloaded songs in My Music and Playlists so you know which ones are on your device and which ones are not.

    Apple added a few other less relevant features to the Music App, but by far Apple Music got the most attention this time around.

  4. Mail Drop in Mail

    Previously limited to Mac and PC, Mail Drop has now been made available on iOS devices. Basically it lets you upload larger attachments, that would otherwise go over normal E-Mail server attachment limits, to iCloud, and share them with your email recipients instead. This is specially handy when trying to send things like videos taken directly on the iPhone.

  5. Camera USB Adapter support for iPhones

    Probably the most requested feature ever, since it was only available for iPad. With iOS 9.2 Apple has now made it possible to connect your camera to your iPhone using the USB camera adapter, and transfer photos onto the iPhone directly.

    This is probably the most useful new feature since many people now rely solely on their iPhones and being able to transfer photos to the iPhone from a digital camera has always been a necessity for many.

Monday, November 30, 2015

Apple Music vs iTunes Match

Let's get ready to ruuuumble!!!!.

With Apple's new music service now available on all promised platforms, including Andriod Devices, lets take a quick look at what it does and compare it to iTunes Match.

iTunes Match

iTunes Match is a $24.99 per year service that will upload your music library to Apple's servers, and make it available to all your devices directly. It will take a max of 25,000 songs, that's twenty five thousand songs. Its been recently updated to take up to 100,000 songs.

The service will attempt to match any song in your computer's iTunes library to a song in the iTunes Store catalog. It if finds a match that song can then be played on any device you own that is using the same Apple ID. Your matched songs will be replaced with the high quality versions of the songs in the iTunes Store catalog. Any song it cannot match will be uploaded to Apple's servers as is, and will be offered to your devices for streaming and download as they were originally in your library.

The Central storage option in Apple's servers allows instant access to stream and download form any Apple device using the same Apple ID for iCloud, and the iTunes Store. This can come in handy, if you have several devices, and do not want to spend a lot of time syncing your library to each of them.

Matched songs are DRM free. Which means you can download the higher quality versions and burn them to CD, or copy them to another computer / device without any problems.


Apple Music

On the surface the service may seem very much the same as iTunes Match, but there are some key differences to be aware of.

Apple Music costs $9.99 a month for single user. or $14.99 a month for Family Membership. This means any member of a Family Sharing group can have access to it, unlike iTunes Match which is a single user service, and cannot be shared.

Like iTunes Match Apple Music will match any song in your library to a song in the iTunes Store Catalog, and will upload as is whatever it cannot match. It will make all your songs available to all your devices using the same Apple ID for streaming and download in as high quality as it can just like iTunes Match would. Up to here, Apple Music appears to be just a more expensive option to iTunes Match.

But Apple Music does a bit more than that. With the $9.99 monthly fee comes access to the entirety of the iTunes Store music Catalog for streaming and offline play back. That is you can play anything in the store for free in its entirety while you remain subscribed to the service. That is literally access to millions of songs and albums.

You also get specially curated lists of songs tailored to your tastes, as well as access to artists and albums features not available otherwise.


Differences

While iTunes Match lacks access to the entire iTunes Store Catalog, its also noticeably cheaper. $7.91 cheaper to be precise, per month. But as said you don't get access to the iTunes store catalog. This may or may not be important to you. But it needs to pointed out.

The other major difference is iTunes Match offers DRM free versions of your matched tracks. Which means you can use these anywhere you want to. Burn to a CD, copy to a USB drive sync to non Wi-Fi iPods etc.. Apple Music on the other hand will offer DRM protected tracks, which means they will only work with authorized devices, and ones that can support the Apple ID authentication. So no copying to USB device or burning to a CD, and no syncing directly form a computer to anything. All music syncing must be done over the internet to validate the subscription to the service. This Applies to all your tracks: matched and uploaded. They all become DRM protected.

This makes Apple Music simultaneously more restricted, but with much more content to offer than iTunes Match.


Cancellation

So what happens when you cancel either of these?

When you cancel iTunes Match, any downloaded songs, to your devices remain functional and playable on the device they are on. You simply loose the central cloud access on Apple's servers. So anything not on a device would need to be synced from your computer normally.

When your Apple Music subscription expires however, any song whether it was matched from your library, or made available offline from the iTunes Store catalog will stop working. You will not be able to play it, or move it, or do really anything with it. Since Apple Music songs are DRM protected, they require the subscription be active for the DRM to validate and let you play them.

Judges' Ruling

At the end of the day, if you can do without access to the iTunes Music catalog, iTunes Match is the better service in most respects. If you do need or just really really want the access to the iTunes catalog then choose Apple Music, but be aware of the DRM limitations.

Useful Links

Apple's Apple Music Website

Apple's iTunes Match Website

Thursday, November 19, 2015

How does Apple's IPhone Upgrade Program Work?

In their now customary September Keynote, Apple announced that this year (2015), would see a new way to get iPhones. No more being locked for 24 months to a carrier. No more waiting to upgrade to the newest iPhone until your plan is up. Now you take control, by being locked into a 12/24 month payment plan with Apple, oh.. wait..
But I'm kidding of course. Its actually a decent deal. Its very close to what Car Dealerships do with their Leasing options. You get a new vehicle every few years when you turn in yours, or keep paying until you've paid off the car you currently have.
Same deal with Apple's iPhones.

The way it works is simple really, its a low payment plan for an iPhone, that lets you get a brand new model every year, or keep the one you have by making a total of 24 payments.

So how does it work:

  1. You start the plan this year, and you can choose between an iPhone 6s or a 6sPlus. Lets go all out and pick a fully decked, 128GB Rose Gold 6sPlus. According to Apple's website, that phone, will cost you a flat $44.91 a month.
  2. After 12 months of paying $44.91, you get an option. Trade up to the new model, or keep your current one. If you Choose to trade up to the new model, you simply return your current one, and you get a new one. No extra payments, or anything. Just like that. Except, your plan, resets, to month 0, so you start again making payments on whatever new iPhone you got for 12 months, and the cycle repeats again.
  3. If you chose to keep your current model, no trade up, then you can keep making payments for another 12 months on it, and at that point, the iPhone is yours. No more payments need to be made after 24 months.

Now, lets do some math:

A 128GB Rose Gold iPhone 6sPlus would cost you outright (in the U.S.A): $949.00 dollars.

If you go for the Plan, and choose the upgrade at the 12 month mark: You will pay $44.91 * 12 = $538.92. That's a little over 56% of the iPhone's full retail price. At that point you can get a new one.

But say you choose to not upgrade, then you keep paying the $44.91 for another 12 months. In that case the total cost of the iPhone comes to: $1077.84. So about $128.00 more than retail. Not such a good deal then right?.

No, the Upgrade Plan includes Apple Care +. A $129.00 value. Which ends up making the 24 month deal $1 dollar less, then if you buy it outright.

All in all, the 12 month upgrade option is a pretty good one, if you don't mind paying for your iPhone every month for as long as you keep upgrading.

To get out, you need to complete a 24 month cycle without upgrading. Which overall is not too bad

The added benefit, of Apple's payment plan, is that you can change carriers whenever you want.

If you take this plan, instead of your carriers upgrade option, then, you are no longer tied to your carrier. You should be able to cancel your service with them at any time, and port your number to a different carrier.

Frequently Asked Questions

  1. Do I need to turn in my current iPhone to start the Upgrade Program?

    No, you can start an upgrade program even if you do not own a cell phone at all. You just sign up for the plan, and you get an iPhone.
  2. Does my Cell Service contract have to be up, or do I have to be eligible for an upgrade with my carrier to start the upgrade program with Apple?

    No. The upgrade program is completely independent of you carrier. Whether your still in contract with them or not, you can start the program with Apple.
  3. Do I need to make a down payment to start the Upgrade Plan?

    No, not at all. There are no down payments, or signup fees.
  4. Do I need to own an iPhone to start the Upgrade Plan

    No. You don't even need to own a cell phone at all to start the Upgrade plan.
  5. Are the iPhone's you get on the upgrade plan unlocked?

    Yes. Apple will give you an unlocked iPhone of your choice, when you start a plan, so you can use it with any carrier.

Apple's Upgrade Program Website

http://www.apple.com/shop/iphone/iphone-upgrade-program

Saturday, July 26, 2014

What to do, when buying a second hand iPad, iPhone, or iPod Touch that supports iOS 7 or above.

What to do, when buying a second hand iPad, iPhone, or iPod Touch that supports iOS 7 or above.

With iOS 7, released on September of 2013 Apple added a new security feature to all its touch enabled devices in an attempt to cut down on device theft.

This feature was called Activation Lock.

Before iOS 7 when somebody stole a touch enabled Apple device, all they had to do to make it functional was reset to factory settings either via the Erase all Settings and Data option on the device, or through iTunes on a computer.

This would set the device to an "As New" state allowing the thief to use the device without any issues.

iOS 7 changed all that with Activation lock.

Basically, when a device is registered with iCloud, and Find My iPhone is turned on in iCloud Settings on the device, it becomes locked the Apple ID and Password that was used to register it. It cannot be reset to factory condition without the password, and will be locked if it is attempted to be reset through iTunes on a computer.

With Find my iPhone (iPad or iPod) active, the owner can track the device's location through the iCloud.com website or from another device that has the Find my iPhone App installed.

The owner can then choose to delete all content from the device and lock it. When this happens, a screen requesting the Apple ID and password will appear on the device preventing any access to it until the credentials are provided

Many thieves will attempt to sell off these locked devices to unsuspecting customers through online services such as E-Bay or Craigslist where its impossible to view the device before purchase.

But what can one do to avoid falling victim to these sellers? Here's a list of of things you can do to make sure the device is not locked, and properly cleared, or to at least avoid losing money on an ill fated transaction?

Verifying the device is correctly wiped:

Hello ScreenWhen a iDevice is first turned on when it was first bought, it will start up at the Welcome (Hello) screen. When a device is reset, it will return to this screen. However, if the owner did not properly remove the device form their Apple ID, the device will show the activation lock screen after selecting a language and connecting to Wifi.

When buying in person, start the setup process, select a language, and connect to a wifi network. If the device is properly wiped and removed from the Apple ID of the previous owner, the next screen should be the Restore screen, where you can choose to use an iCloud backup to set up the device from, or continue and set up as new.

If buying sight unseen, its best to have the seller provide contact information, and withhold payment until you are certain the device is not locked.

You can also request the seller provide a picture of the device at the iCloud settings screen in Settings->iCloud, and verify that there is no iCloud account signed in, and that Find My iPhone / iPad is turned off there.

Even if it has not been wiped clean, having no iCloud account signed in there, means the device is not locked to an Apple ID, and should not become activation locked to it once restored.

Apple used to have a service at http://icloud.com/activationlock where you could verify the activation lock status of a device, but has since taken it down, and is no longer available.

If it ever returns, it is a great tool to use when buying second hand as it could easily tell you if its locked or not.

Should the device not be correctly wiped, you can direct the seller to this Apple Article What to do before selling or giving away your iPhone, iPad, or iPod touch, and request they follow its instructions to wipe the device and remove it from their account

This is a basic step, as nobody would want to sell a device that may contain private and sensitive information. So a wipe must be performed.

If the seller is unable or unwilling to do this, then this should raise big red flags, and the device should not be purchased from this seller

Activation Lock Screen

If the device appears to be at the Activation Lock screen, then it was most likely locked from iCloud by the original owner.

Again, requesting the seller to remove it form their account through iCloud.com should be the first step before any money is exchanged.

If the seller is unable or unwilling to do this, again, red flags should be raised, and purchase of this device should not be considered

Passcode ScreenIf the device is at the standard Passcode unlock scree you should again request it be properly cleared before purchase.

If the device is running iOS 6 or an earlier version:

Request that the previous owner sign out of all services under Settings, and clear the device by going to Settings->General->Reset->Erase all Content and Settings


Default AppsWhen properly wiped, and released from the previous owner's Apple ID, the device will have nothing on it except the Default built in Apple Apps. As tempted as you may be to want to keep some of the sellers Apps or other content, this is never a good idea. All Apps, media, books, etc... bought or downloaded from Apple's stores are forever tied to the Apple ID that was used to buy/download them. As such Apps will always require the Apple ID and password that was used to download them, to update them in the future and media and books will remain tied to the Apple ID used to buy them, and may not be accessible later.

Monday, January 21, 2013

Updating Windows XP to Windows 8 Pro

Windows 8 Logo

Just got done updating my old home PC that was running a very trim Windows XP SP3. The machine worked great. And I was weary of updating because I knew I would not be able to run game like Trackmania on Windows 8 among other things. But having gone through the numerous Previews of Windows 8 and actually liking the evolution, I decided to finally take the plunge and update the XP side once the installation of the Windows 8 Release Preview expired.

So I thought I'd give it a shot from a normal user point of view. I put the 32bit DVD of the Windows 8 Pro Update package and waited. (in retrospect, I should have put the 64 bit version, as this is an AMD64 Semprom. Yes, its a low line Pc, but since I don't play top of the line games on it (that's hat the Xbox is for), it works at home fine.)

Anyway, the preparation stages went smoothly. Even the reboot went down without a hitch, but once the final setup was up, problems started arising.

The first one, it wanted to connect to MS servers to activate, and log me in to my "Microsoft Account". However the installation failed to recognize my wireless card. So it could not do that, I had to skip that part, and setup a local account. Once Windows started and was usable, I noticed, I was missing a few things from the Start screen. Namely, the Desktop tile. No biggie, I'll simply go to search and run Explorer to get at it, see if I can get the tile back later. I move the mouse to the side to get the charm bar, and nothing happens.

O.k I'll reboot, see if that helps things. The Pc rebooted rather quickly, and lo and behold still no Desktop Tile. Fortunately the charm bar did come back. So I was able to get into Desktop mode by running explorer, and into control Panel all was looking good, until I tried clicking on Administrative Tools, I got a message saying the location was unavailable. Fine, I'll have to install my wireless card from the driver CD and do a bit of Googling to figure out what happened. So I go to install the drivers, and they appear to install o.k. However the card would connect and disconnect from my network every few seconds. Which made browsing, quite difficult to say the least.

After wrangling for a couple of hours with the network card, I gave in, drove to BestBuy, and bought a cheap USB Wifi card. This one was detected immediately, and required no drivers, Windows picked it up immediately. However, since all my Applications had not been carried over, I had to open IE and get to a suitable browser download.

So I wandered the forums, looking for solutions to problems I was having, and it all boiled down to either a Refresh, and a Reinstall. I really wasn't looking forward to a complete reinstall, but after the refresh did nothing to alleviate the issues, I gave in, having backed up before updating, I had everything on my external, so I just rebooted the machine with the DVD inside and proceeded to wipe out the partition. Windows again went through the setup process without a hitch, and when it booted into the final setup, the USB wifi card was picked up, and I was able to setup the Microsoft Account o.k. Once at the Start Screen,the Desktop Tile was back and functional, and yes Administrative tools was working again.

Hopefully its not something very common among updates. But if it is, I suggest just biting the bullet, and performing a complete clean reinstall.

Wednesday, October 24, 2012

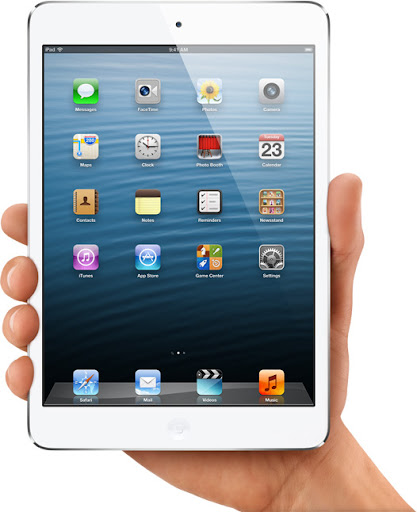
Overview of iPad Mini and iPad 4 reveals

iPad Mini
I'm by no means an Apple Fanboy... I like their products, but I can still bash them when required.
Today I want to write a bit about their keynote this Tuesday and specifically their reveal of the new iPads
Their Tuesday reveal of their new iPads left many to question many decisions on their new products not because they are  bad, but because they are at all.

iPad 4

Having released the iPad 3 only 6 months ago, it puzzles me why they would release a new one so soon. Usually they have a yearly release of products, iPhones for the most part follow the yearly release for major updates, and a 6 month release for and versions such as the 3Gs and the 4s.
iPads have been pretty good at keeping a yearly release until now. but that's not really the puzzling thing. What is more intriguing is the decision to discontinue the iPad 3 in favor if the iPad 4 but leave the iPad 2.
Looking at the specs, it seems the iPad 4 is really only a very minor improvement over iPad 3. So it makes sense that they would not need two extremely similar products competing with each other. However that leaves the question of why release an iPad 3 at all 6 months ago. They could have simply kept the iPad 2 for those 6 months, and release the iPad 4 as the iPad 3 along side the iPhone 5. Then it would have been a major upgrade.
For those fearing the iPad 3 will no longer receive upgrades, I find that extremely hard to believe. Just because they aren't making the device anymore doesn't mean they'll stop supporting it with upgrades. At least one more major update so it gets 2 major updates total like the iPad 2 had.

iPad Mini

This release is the one I have to question more. The iPad mini is not only not a real good competitor in terms of specs in the 7 inch market niche, but its also the more expensive alternative.
Personally I don't think the 7 inch tablet market is the way to go. Nor do I think a 5 inch iPhone is the way to go either. The intermediate sizes make it too cumbersome for a phone and not large enough for a good tablet experience. If I want to watch movies, look at pictures, read books, I want to do it in a larger screen rather than a smaller screen. The 10 inch screen is a good size for a handheld device without sacrificing detail or size. For this reason the 7 inch tablet market is one I'm not particularly interested in. Nor do I think many people are. Walking around places like Starbucks, Libraries, museums etc... People carry 10 inch tablets with them. Very very few opt for the smaller 7 inch ones. Even then more people are going for the 4.x inch screen phones. Samsung even has a niche all its own with the 5 inch Galaxy Note. How many galaxy notes have you seen around? Again the size makes it cumbersome for a phone, and limits the features a tablet can provide.
With 7 inch tablets as low as 150 bucks, what are you getting in the mini for the extra 200 dollars that warrant it. Yes tons of apps and games are available in the store, but the display is a standard display well below other tablets resolutions, the processing power is also not to par with other tablets in the range.
At the time of writing, the Google Nexus 7 beyond its manufacturing issues, still offers the best bang for the buck. Its even more surprising when Steve Jobs himself outlined 5 reasons why 7 inch tablets where not viable options.
Only time will tell if the Mini really is as successful as they hope it is. Personally 7 inches is not enough for me on a tablet and I don't think the mini will get a version 2.

Wednesday, October 10, 2012

iTunes Survival Tips Part 2

Usage of an AppleID

Apple ID
As I said in part 1:

# 3. Keep a single Apple ID.

Yes as annoying as it sounds, the best practice is to keep a single Apple ID. Why because you can never merge the extra accounts, and you'll have content in one you won't in the other...
However this should only apply to your Apple ID and devices. If your girlfriend or boyfriend also have an iDevice (particularly an iPhone) you really need to have separate ID's.

Don't use the same Apple ID in 2 or more iPhones

When setting up an iPhone use the apple ID of the person the phone belongs to. Why? Because otherwise both phones are setup as belonging to one Apple ID. What that means is that Apple's servers then think they are supposed to send all notifications, all messages and all events to both devices.  Like if you had a iPhone and an iPad and wanted both to get the iMessage notifications. While it may be interesting to read other people's messages it can get a annoying, cumbersome, and obtrusive. Each individual iPhone should have its own individual Apple ID.

Don't use the same AppleID for iCloud backups of different phones.

You should never share an Apple Id for iCloud backup as that can cause issues with the backed up data. This is specially problematic as the backed up contacts of one iPhone can merge with another, or in worst cases overwrite them. So you get either a mess of contacts, or none of your own. I'm sure I don't have ti explain the problems you get from having merged contact lists, or having yours overwritten by your girlfriend's.

Don't share an Apple ID for iTunes purchases

As much as you'd want to, or think its a good idea, it isn't. While having purchased content across the your own devices is good, having purchased content across devices owned by different people is not. Even if its your girlfriend or wife and you want to share the content avoid it. Why because it invariably comes down to having content you don't want downloading to your device. I for instance don't need to have the complete set of Sex & the city episodes downloading to my iPhone because my wife decided she wants to watch them. Also I don't need it using up space in my iPhone or iPad.

With that said, I can appreciate the need for a shared AppleID when purchasing content and being able to use it across everybody's devices, however the iTunes platform is not set up for it, and while you can use say a House Apple ID where you purchase movies and Tv shows to watch at home through an Apple Tv or even an iPad connected through HDMI to the TV it come back to the original issue. The account is independent, and its purchases cannot be merged with Apple ID's iTunes library.

All in all, iTunes, and Apple's platforms were designed for personal Apple ID's sharing was never intended because they first and foremost wanted to prevent piracy, and content copying. So while you may feel inclined to share an Apple ID, don't. In the long run it will only cause more issues than it will solve.

Sunday, September 23, 2012

iTunes survival Tips

iTunes icon
Apple has come a long way since the days of the Macintosh Apple II, but it seems in their effort to keep all store purchases secure and "un-pirateable" they've also made their users lives a living nightmare.

iTunes is probably the most hated piece of software out there that isn't a virus, or malware (Well... technically speaking). It makes seemingly simple tasks incredibly complex. And things like recovering your library after a PC crash become almost impossible.

Its less offensive now, but a few years ago, it would seem iTunes updates would show up every couple of days, but were close to 100MB in size. That's not an update, that's the whole damn software to be downloaded every couple of days. Now it seems to have cut back on the frequent updates a little. And also reduced the size a tiny bit too.  But still at an average 70 or 80MB a pop it still kind of annoying.

Still since there is no alternative to manage your iDevices, were stuck with it, so here are some tips to keep iTunes under control or at least make it a little less aggravating.

# 1. Consolidate


Consolidation is one of the few things that can aid in maintaining  control of your library. If you have music strewn about all over your hard drive or in different hard drives, it makes it very hard to manage, and recover should something go wrong. Consolidating makes iTunes copy all music, videos and playlists to a single location for it to manage.

Go to  File->Library->Organize Library and tick the Consolidate check box to make iTunes put everything inside the iTunes library folder.

# 2. Weed Out


We all like to have all our content at our finger tips, but there comes a time when you need to do some spring cleaning, and remove things you no longer need. Clearly 3 moth old Podcasts you downloaded from a website devoted to onion chopping that you've been to only once may not be relevant any more. Remove them not only to free up space the limited storage on your device, but also to make maintenance of your library a little easier.

I've had to backup iTunes libraries for clients that are in the 100's of  GB but most of the space is taken up by old podcasts or video files they haven't watched or heard in years. While keeping your video and music library for posterity is always good, there are somethings that are just not worth the space they take up. Things like podcasts and other time relevant content like news casts etc..., can be erased. With iCloud you can still re-download the content should you need to in the future.

# 3. Keep a single Apple ID.

Yes as annoying as it sounds, the best practice is to keep a single Apple ID. Why because you can never merge the extra accounts, and you'll have content in one you won't in the other. It also makes it hard to keep a functional consolidated library if content is strewn about in several accounts. I'm a victim of this myself, I have 2 accounts. The problem used to be you could not download content from a country specific store while in another country. This seems to have changed, as I can now download content from the American store while abroad. So I keep only my american account. But when I used to travel, I had to use a local account to be able to download things. Sadly there's no way to merge account purchases. So my purchases in the other account have had to remain there. As of this writing there is still no way to merge Apple ID's from different countries which is very very annoying for many, many people. It becomes more irritating when you realize content in certain country stores is really bad, and you still have to resort to an american store to download. I would suggest to keep an american account for pretty much everything. It does not affect your carrier fees, or local country data whatsoever, but does it make it easier to manage content, and get the most up to date content.

# 4. Backup.

This is the most important point. Backup your iDevice regularly to your iTunes library, and backup the iTunes library as well. Backing up your iDevice also downloads your Camera Roll. Which otherwise does not get synchronized in iTunes. So its important if you wish to have your photos saved. Backing up your library is also a must, as it will let you restore to any iDevice should the need arise. Backing up the entirety of the library folder whether on a Mac or PC, will preserve everything stored in your library and synced, as well as your iDevice backups. Which contain other things not synchronized to the Library like the camera roll. Should your computer hard drive die, having a backup of your library handy, and up to date and a current backup of your iDevice should reduce headaches to a minimum. And remember, there's no way to restore your library from your device. Though there are some applications out there that claim to do it, but almost all of them cost, and I don't know if they are any good.


Friday, September 21, 2012

iOS 6 Issue List

iOS6 Issues
I'm starting a list of issues I'm having with Apple's latest iOS update.

This is an iPad 2.

iOS 6 Official download.

I want to point out there's several things I like about the update, and this list will not include the lack of certain features in the release for iPad 2 that exist for the iPhone5 and iPad 3 such as Siri.
This is going to be a list of issues I'm having, with the release as is, and the included features.
I'll update the post with more issues as I encounter, and also solutions to the problems also as i find them.
1. Apple Maps. O.k. I'll cheat on this one but not really because it really isn;t in any release. Lack of Street View:.

As an avid user of Google Maps before, the lack of street view in the new Apple Maps app is quite jarring and sorely missed. This feature really needs to exist very soon. Or hopefully Google will release a new version of Google Maps to the App Store for download. As cool as Fly-through is for the cities that have it, its a gimmick, and not very useful when looking for an address.
2. iTunes: It may be just me, but the iTunes store is pathetically slow now, and keeps saying it can't connect. Loading image tiles in any section takes ages, and search is almost unusable.
Apparently there is a strange fix for this that gets rid of the "Cannot connect to iTunes store" popup. But not the slowness.
Go to Settings > General -> Date & Time, and set the date to one year ahead. You'll get a couple of notices about backups, and the same dreaded popup message. When that happens cancel it, and set the clock back the the correct date. The annoying popup should go away once you log on to the store successfully the next time.
Search is still very slow though, and the image loading inside iTunes still has issues. Before you comment about my internet connection,I actually downloaded a Movie rental from iTunes and it finished in about 25 minutes. Though it did take a while to get started, and even failed the first time. Though once it started it downloaded really fast, and with no other issues.
iPad iTunes
3. Internet connectivity issues. Seems the iPad is having some issues accessing the internet. Now my PC has no issues, and connects fine to my router, and the iPad had no issues before the upgrade. So something in iOS 6 is not liking my router or takes a while to negotiate the connection. It happens in quite a few apps. Most notably... Facebook.
Well that's it for now. I'll update as i keep using it, and having issues with it of course.

Friday, September 30, 2011

Windows 8 Metro Diary: Day 3

The following few posts will chronicle my experience with the newly released Microsoft Windows 8 Developer's Preview, made available as a free download from Microsoft themselves.

Monday September 26th - Friday September 30th 2011

Day 3 is a little different, in fact its a week, since I had less time to play around with it, and less things to talk about, I'll bundle the week together.

After several days of digging around, I found a way to get the developer tools for Metro style apps for the other downloads, So I have in fact started to develop one application. However since Microsoft considers this a breach of EULA I cannot disclose the technique here. Suffice it to say, its simple and straight forward. Which makes it even the more puzzling that Microsoft chose not to include this in all the downloads.

However that does not end the issues. After a few days of development Visual Studio 11 crashed on me and has never come back up. It now crashes every time I try to load it. However there is another version that gets installed which is labeled the Experimental Instance which continues to work correctly. So I'm using that.

I've also had an issue with my DVD-Drive, an LG DVD-RAM drive. Its picked up flawlessly by both my BIOS, and Windows XP in the same machine, but Windows 8 just refuses to see it. I guess I could chalk it up to a glitch in this pre-release version and expect it to be fixed b y the time the actual full release hits shelves. Though its still a bit of a mystery as to why it won't see it. More so considering that it was that drive that was used to install Windows 8 from the burnt DVD.

In any case moving on to my Metro style application, I have to say development is very natural if you are familiar with the languages involved. I chose the HTML 5 and Javascript approach, but there is of course the C++, C# or even Visual Basic alternatives if required. All 4 boil down to a full screen website style interface with the engine behind the app being any of the mentioned languages. Its an interesting concept, that actually works surprisingly well for consumer applications such as image management, social site interactions, games, and other none productive apps. However I don't see office based apps as Word, Excel, financial applications, etc.. making the leap to Metro Style.

I do expect however that we'll see Metro based alternatives, with probably less functionality, but nicer interfaces. A Metro style text editor is inevitable as will be a basic Image editor. Standard every day tools like a basic email client and instant messenger are also, no doubt, in the horizon.

For users with more involved requirements the now called Desktop mode is basically an update to the Desktop of any Windows version prior to this, and in which users will be able to run non metro style apps as they would in older Windows versions. This is where most corporate environments, and more technically oriented users will spend most of their Windows using time.

In the end Metro is clearly aimed at final, home or casual users; by offering a nice interface to their most often used apps, without needing to get into the actual system OS. It turns a PC into a tablet which is what most casual users would want for their regular tasks.

As far as my metro App goes, I developed a pretty basic unit converter. From Metric to English units, and so forth. Its not done yet, but here's a screen shot to tide you over until the next post.

Photobucket

Tuesday, September 27, 2011

Windows 8 Metro Diary: Day Two

The following few posts will chronicle my experience with the newly released Microsoft Windows 8 Developer's Preview, made available as a free download from Microsoft themselves.

Sunday September 25th 2011

Sunday Morning rolls along and I'm thinking great time to see what this puppy can do. I was all set to start delving into the world of Metro Apps when I realized the 32bit version of the Windows Preview I downloaded does not contain the adequate development packages. So off to Microsoft's site to download the Visual Studio 11 Preview package. Well The download is a Smart Installer, though there is a 3 part download you can opt for as well. The complete setup is close to 2GB. So again Another hour or so waiting for it to download.

Once completed it begins to install, it took about another 30 to 40 minutes to finish configuring everything. It was finally done, I could start checking this out, and start getting up to speed in how the Metro Apps work. So Move out to the Start Screen with all the Metro tiles and *whoah!!* 20 Tiles where added to the screen. I realized then and there that the screen simply takes anything and everything from our old trusty Start Menu location and plops it as 150 by 150 pixel tiles.

Anyway, so I run Visual Studio, and all is o.k. It looks interesting. Lets try creating a new project, something simple, a Hello World tile as is customary to do. So I add a single div to the project, (this is a HTML 5 and Javascript Metro App project), configure a few things and try to run and execute to see what it looks like. Well a couple seconds go by, and bam, 2 errors crop up. makepri.exe cannot be found, and the Modern SDK is not there. Well after a lot of digging it turns up, that Microsoft in all its unparalleled wisdom decided to issue only one of the Developer Preview downloads with all the files required to develop Metro Style apps.

The 64bit 4.8GB full download.

Now, I know what you are thinking, how is that a problem, just download that. Well I can't, and many other people can't either. Why You ask? Well I don't have a 64bt computer, so I can't run that. Many people don't have dual layer DVD's to burn, or their drives can't actually burn them. So we choose the alternative: Download the 32bit Windows OS preview, and then install the Visual Studio Preview separately.

However this method leaves you without the essential Metro App development files which is the entire purpose of these previews. I don't understand the logic behind only providing the tools in one of the packages? What's to gain here? I really don't understand. Its like having rollercoaster with a sign that says come all and try it, but once you are inside you can only get the full ride if you have a $20,000 Rolex watch and have been lugging around a very large duffle bag. Everybody else gets just the shortened route.

So that's It for day 2, hopefully day 3 will bring some much needed solutions..

Any comments or questions, feel free to post below.

Sunday, September 25, 2011

Windows 8 Metro Diary: Day One

The following few posts will recap my experience with the newly released Microsoft Windows 8 Developer's Preview, made available as a free download from Microsoft themselves.

Saturday September 24th 2011

We start off with a hefty 2.8 GB download, that's 2.8 Gigabytes of data, as in your standard USB pen drive capacity these days. It took a little less than 2 hours to complete.
After that we need to build the customary Installation media from the download. A simple matter as its an ISO image, a CD/DVD image file which contains all the information needed to burn an installation disc using any number of tools available. I used ISOburner a free safe tool for just such tasks. Once the DVD is done its on to installation. I decided to do this as an actual install rather than a virtual one just So I could get the full experience. So I went into my Hard drive drawer and picked an empty one I knew was operational. 80GB of space should suffice I thought, I don't think I'll be installing many things onto this, and I it will be basically for testing purposes.
So the Install goes similarly to Windows 7 installation, it lets you pick your destination drive, and ipartition it as you see fit. The installation automatically creates a 300MB system reserved partition regardless of your partitioning choices. It deducts the space from your main OS partition. Once complete it proceeds to copy and install files. It took quite a while to install, about 30 minutes in my not so powerful test PC.
Windows,8,metro,sidebar,interface,new
When all is said and done, you are treated to the new Metro Start Screen. Instead of your regular start menu, you get a full screen of what Microsoft now calls tiles. Squares or rectangles that serve as shortcuts for applications and other functions. Several pre-installed apps and games grace the screen, most notably Socialite the Facebook app, and of course IE10 Metro version. (more on this later)
My first task of course was setting up the Internet connection, as Windows did not automatically detect/install my wireless card. Of course you can't really tell what is going on as the interface is aimed at final users, so off the bat we need to dig into the new layout to find the familiar Device Manager. (I wonder If I can add a Device Manager Tile for easy access). Installation of the wireless card was as painless as it has been in previous versions of Windows.
With that done we get a look at the new Wireless network list; a green sidebar, as Microsoft calls it. It offers a very nice, large and crisp font for the network names and the standard bar display for the signal strength. A nice face-lift to what we had been seeing since Vista.
Windows,8,metro,sidebar,interface,new
The next test drive was of course IE10. Now here's were things get interesting, Microsoft has divided the applications into 2 categories: Desktop applications and Metro Style applications. Desktop Applications are your run of the mill apps you've been using in other versions of Windows, they open in standard windows, and can be maximized, dragged around, closed etc... The Metro Style App is the new kind of app that takes advantage of the new Metro Engine and runs full screen, cannot be dragged or moved, or even closed in the regular sense of the word. Its basically a full screen dynamic Web application that runs outside a browser and covers the screen. It can be swiped out of the way, or hidden. When hidden or swiped out of the way the app suspends rather than outright closing.
For me this is a slight drawback, as It means you quickly have many many things running in the background you may not want or need, and with no real dedicated closing mechanism, your are left with only the TaskManager route of closing these applications.
Technically speaking Windows memory manager should close apps you haven't used when running low on memory, however I've never been keen on letting Windows handle the memory usage by itself, I like to be able to close things when I'm done.
Going back to IE10, it does come in 2 flavors Desktop, and Metro. In Desktop mode is very similar to other versions of IE, (8 & 9) so nothing much to comment on there. While in Metro Mode its as explained a full screen app, with the address bar now positioned in a smokey dark gray translucent hideaway bar at the bottom of the screen. No other visible controls are present. When navigating the website the bar disappears for the full screen experience. To bring it back you must right click the screen. This brings up the address/tool bar and the tab/page bar at the top. The Address/tool bar offers your regular forward, back and refresh buttons, along with a search button and a Pin to start button. So you can add your favorite sites to the Metro Start Screen.
The Tab/Page bar at the top shows thumbnails of your currently opened tabs, as well as the option to close them or open new ones. Clicking back in the website makes the bars go away and puts you back into browsing mode.
At the end of day I can see the interface is very much designed for touch based devices; however the mouse and keyboard experience is pleasant enough to be quite usable and satisfying. However I can see corporate environments turning it off, in favor the desktop mode.
Day 2 will see me install a few more applications, and wrangle with a few more pieces of hardware So stay tuned for Day 2 of the Windows 8 Metro Diary. .
Comment, subscribe, ask questions...

Friday, May 20, 2011

Ajax 101

Asycnronous Javascript And XML, the mysterious entity known as AJAX.

What is it? What does it do? In simple terms its a method of connecting a website to a server side script without needing to submit a form, or reload a page.

For years the usual way of getting data from the server was to submit a form with values to be processed by the server which would in turn return the results of its process. This usually slowed down websites considerably, and there was no real time interaction between the user and the website.

Ajax solves this by opening a direct connection to the server, and requesting the data processing without needing to submit a form.

Ajax is composed of 3 main sections:
  • The Javascript that executes the Ajax call
  • The Ajax that calls the server side script
  • The Server side Script that takes the parameters and produces the data to be returned to the website.


The main component of AJAX is the XMLHttpRequest object. This thing does it all. It opens the connection, waits for the results, and then makes them available to JS for any further parsing or usage.

But before we can use that we need our Server Side process. This can be pretty much any script that returns data, and it can be done in pretty much any language the server can execute. PHP, ASP, Coldfusion etc...

For our example we'll be using PHP.

The Server Side Script

The Server Side Script has one important task to accomplish, and that is to produce the results we need. The script should be designed like any server side script, except we don't need full html tags as we are going to deliver this to our Javascript layer for usage in an already established page.

So basically all we want is for our script to output our data. We could include a table structure or some other markup if we require, but only if we don't plan for your JS side to do anything to data, otherwise outputting in usable formats such as comma separated strings, or a JSON object is enough.

For our example script we'll just have a process that takes a value from the POST array and echoes it out in a string.

PHP Script


<?PHP

if(isset($_POST['id'])){

echo "The ID Passed is: $_POST[id]";

}

?>


Javascript and Ajax

No we need a way of calling our server side script, and getting back the results. to do this we will require the XMLHttpRequest object from the JS window object.

We start by defining our request object:

Request Object


var requestObj=new XMLHttpRequest();


We can now use our new object to initiate the call to our server side script. However before we can do that we'll need to make a decision. do we want our call to be synchronous or asynchronous. A synchronous call means the Js stops and waits for the server to complete the processing before continuing on, this effectively makes the website hang and be unresponsive until the call is finished. Ultimately we would only use this if don;t have lots of processing to do and the response would be returned rather quickly.

Otherwise we'll want to use the asynchronous method which as it implies lets the website and all JS functions continue to run while the server process is being executed. This allows the user to keep doing things while the request is under way.

We are going to go for the asynchronous method, so we need to
setup a function to handle the data once it returns. For this we use the onreadystatechange event of our ajax object. onreadystatechange triggers every time the the readystate property changes. The readystate property simply holds the status of our request. We want it to be 4 so the Request is complete. The other values are not relevant in the context of a webpage as you can't actually do anything about them.

We also have to check the status property. The value we want is 200, which stands for "O.K." that means the call to our server side script executed correctly and data was returned. Status has many values that you can check; most are the standard HTTP status codes like the classic 500 Internal Server Error, 404 Not found error etc...

We check for both those values, and if they are 4 and 200 we can proceed to use the responseText value to get whatever our script produced as output.

Request Object and Properties


requestObj.onreadystatechange=function()
{
if (requestObj.readyState==4 && xmlhttp.status==200)
{
var results=requestObj.responseText;
document.getElementByID('myDiv').innerHTML=results;
}
}


We can then use our results to populate anything we need using regular JS calls. In the example above I simply placed everything into a div.

The next part of our Ajax interaction is to call our actual script. We'll use the open() method to define our script address, the method we want to use, and the type of call (synch vs asynch) amongst other things.

The Open method


xmlhttp.open("POST","script.php",true);


The Methods are the same ones used in a From, GET or POST. POST is the better alternative if you plan on sending a lot of data to be processed.

The address of our script is the second value we need to set. the request object is limited to reading scripts form the same domain it originates so you can;t go out and read pages from other websites to mash up into your own site.

We then need to set up our headers. Since we are basically recreating the function of a form, we set it up as such.

Headers


requestObj.setRequestHeader("Content-type","application/x-www-form-urlencoded");


And finally we need to send our parameters to our server side script.

Send Paramters


xmlhttp.send("id=" + value + "&action=list");


The parameters will appear in our POST array inside our server side script. In the case of PHP the $_POST variable.

You can set a string, or you can add values from variables or both like above by using concatenation. "value" is a variable that contains the id we wish to pass. We separate each pair with an ampersand &

With that we are done, we can setup our ajax call to be executed when a button is pressed.

Button Call


Enter ID: <input type="text" id="idbox">

<input type="button" onclick="runAjax();">


With that done, inputing an ID and pressing the bun will run our Ajax function and in turn execute our PHP script without needing to reload the page.

In our next installment we'll be looking at a slightly more complex example, by getting data from a database on the fly.

Working Example


Download the example:

Questions? Comments? Use the comment form.

Wednesday, May 18, 2011

Common Validation Errors

In a previous post i talked about the importance of validation, but I never delved into what types of errors you would commonly encounter. Today we are going to take a look at 3 common errors you encounter when validating.


There is no attribute "xxxx"


Html elements or tags have attributes one can assign to them. things like a name, and ID, a class but sometimes we may try to use an attribute that an element doesn't have. Or an attribute it may have in one particular doctype but not in another.

For instance lets say we are building a form to get user input:

From Code

<form name="MyForm" action="mypage.php" method="POST">

<p>User:<input type="text" name="user"></p>

<p>Password:<input type="password" name="user"></p>

...

</form>


If I were using an XHTML strict doctype in the website that contained this, the error would be something like:


Line 7, Column 12: there is no attribute "name"
<form name="MyForm" action="mypage.php" method="POST">
You have used the attribute named above in your document, but the document type you are using does not support that attribute for this element.


In <!DOCTYPE html PUBLIC "-//W3C//DTD XHTML 1.0 Strict//EN"

"http://www.w3.org/TR/xhtml1/DTD/xhtml1-strict.dtd"> only input elements can have a name. Divs,paragraphs, links etc.. cannot have a name attribute.

Most would think a name is vital to be able to access form elements if you are using JS to validate the form. For XHTML Strict, you only need an ID for the element you wish to access through Javascript.


End tag for "xxxx" omitted, but OMITTAG NO was specified


This one of the more common mistakes simply because its the easiest to over look.

It happens on certain tags such as image, break and any other tag that doesn't require a closing tag to accompany it unlike other tags like divs, links, spans etc...

Closing Tags


<div></div>

<a></a>

<span></span>


----


Self Closing


<img src="">


<br>


<input type="text">


Self closing tags like above require an extra special character to properly close them. the forward slash. In XHTML strict these tags need to be terminated as .../> to be properly closed, otherwise they generate errors. Since Transitional doctypes don't require this, its easy to forget to add them at the end.


document type does not allow element "xxx" here; missing one of a, b, c,d,e,...


This error is more of a nitpicky error, Basically what is says is that whatever xxx is, it cannot be placed wherever it is you have it because it requires something else to contain it. The most common example of this are label tags. Most would assume you can simply add them in front of an input to add a text label to it. XHTML Strict doctypes will barf at it as they require the label to be inside a block level element such as a div or a paragraph.

Wrong


<form ...>

<label>My Label</label><input type="text">

</form>


Right


<form ...>

<p><label>My Label</label><input type="text"></p>

</form>


There are many more errors, some harder to understand than others, however its important to read the provided reasons for the error, as more often than not they contain vital clues to what may be wrong with that particular line.

Tuesday, April 26, 2011

Floating 102

Sop what interesting things can we do with float?

Lets look at a few examples:

Images in Text


When you have a section with text, and you want to have an image in it, you may need to have the text wrap around it so as to not break up the text. By default images will simply break up the text if placed inside, or just sit on top of it if placed before it.

cover


If we want to have the text wrap around the image we need to float it to one side.

CSS


img{
float:left;
}


Here it is in action:


What happens when we have several images to float.

If the are side by side in the html, they'll continue to float left like below:


If would like the to simply drop below eahc other and have the text wrap around them where they end, we simply need to add a clear:float property to out image CSS.

CSS


img{
float:left;
clear:both;
}


It will look like this:


So floats give us nice layout options with images, but what else can it do for us?

Columns


Usually floating is used to create columns in a layout, as you can place divs side by side and fill them with content. Lets say we want a 3 column layout like a newspaper.
Unlike tables, there is no way yet to make floated divs be as high as each other, they'll be as high as the need to be to accommodate their content. As we've seen in previous entries if there's anything floated inside them extra steps need to be taken to make the div correctly wrap around its contents, however in all cases once its wrapped around, it will only be as high as the content requires.

To create the column layout we need to fake the height of the divs, to the observer it will look like they extend down, but in reality the stop where their content ends.

For our 3 column layout here's our basic HTML.

HTML


<div id="wrapper">

<div id="column1">

<h4>Column1</h4>

<p>Content</p>

</div>

<div id="column2">

<h4>Column2</h4>

<p>Content</p>

</div>

<div id="column3">

<h4>Column3</h4>

<p>Content</p>

</div>

</div>


Here's our CSS:

CSS


#wrapper{
width:402px;
background-color:#686868;
color:#DEDEDE;
overflow:hidden;
}

p{
margin:4px;
}

h4{
text-align:center;
}

#column1{
float:left;
width:120px;
}

#column2{
float:left;
background-color:#dedefe;
width:160px;
color:#686868;
}

#column3{
float:left;
width:120px;
}


See it in action:


As you can see the columns appear to match heights, however, if we add a border to the columns on the outside (column 1 and 3) you'll notice they end where their content ends, the rest is an optical illusion caused by the wrapper's background which is gray.

This works for 2 or 3 columns in much the same way, if you need to have more columns then it gets much more complex. We'll talk about multi column layouts in a future article. For now know you can do this for up to 3 columns.

Sunday, April 17, 2011

Floating

The ever present, and most often misused property in CSS after of course position.

Floating takes an element, and pushes it to one side of its container or parent element. It takes the element out of the document flow, so it no longer affects its parent's dimensions directly.

What this means is the floated element while still under its parent's general jurisdiction, no longer has any effect on it. If the parent has no height defined then the it will simply collapse, and the floated element will just float above it.

example:

HTML


<div style="width:300px; border: 2px solid red; background-color:#dedede;">

<div style="float:left; background-color:#464688; width:160px; height:200px; color:#dedede;">This Div is floated left</div>

</div>


See that red line? That's the parent div that collapsed when I floated the inner div.
As said before, floated elements do not contribute to their parent's dimensions.

To resolve this you can do 1 of two things that will be cross browser compliant.

Add an overflow property to the style of the parent div, or add an extra clearing element to clear the float from the inner div.

Adding overflow:


HTML


<div style=" overflow:hidden; width:300px; border: 2px solid red; background-color:#dedede;">

<div style="float:left; background-color:#464688; width:160px; height:200px; color:#dedede;">This Div is floated left</div>

</div>


Any type of overflow will accomplish the same result, however :hidden is better if you don't want to have disabled scrollbars, or just a tiny amount of useless scrolling in some browsers.

Adding a Clearing Element


HTML


<div style="width:300px; border: 2px solid red; background-color:#dedede;">

<div style="float:left; background-color:#464688; width:160px; height:200px; color:#dedede;">This Div is floated left</div>

<p style="clear:both;"></p>

</div>


Adding an empty element in this case a paragraph element with a style consisting only of clear:both will clear, or reset the floating, and make the container wrap around the floated elements. It looks the same as the overflow method, but has a small caveat. It may cause an extra space to be present, if you have margin or padding applied to the element that is clearing the float.


This is all fine and dandy when there's only one floated element, what happens when you have 2 or 3 or more floated elements. Here's where CSS gets interesting.

Think of a cardboard box for a moment, and imagine you want to place place X amount of objects side by side on one side of the box. You can keep placing them as long as you have room inside the box. Once you exceed the boxes width, you have to move the object "under" the other objects and start a new row.

The same happens in a div with floated elements. When the total width of the objects inside exceeds the the parent's width they drop down. The direction they drop is based on the direction they are floated. If they are floated left, they drop down and move all the way to the left, if they are floated right they'll move to the right.

HTML


<div style="width:300px; border: 2px solid red; background-color:#dedede;">

<div style="float:left; background-color:red; width:70px; height:200px; color:#dedede;">This Div is floated left</div>

<div style="float:left; background-color:green; width:90px; height:200px; color:#dedede;">This Div is floated left</div>

<div style="float:left; background-color:blue; width:60px; height:200px; color:#dedede;">This Div is floated left</div>

<div style="float:left; background-color:yellow; width:120px; height:200px; color:#dedede;">This Div is floated left</div>

<p style="clear:both;"></p>

</div>


<hr>


<div style="width:300px; border: 2px solid red; background-color:#dedede;">

<div style="float:right; background-color:red; width:70px; height:200px; color:#dedede;">This Div is floated left</div>

<div style="float:right; background-color:green; width:90px; height:200px; color:#dedede;">This Div is floated left</div>

<div style="float:right; background-color:blue; width:60px; height:200px; color:#dedede;">This Div is floated left</div>

<div style="float:right; background-color:yellow; width:120px; height:200px; color:#dedede;">This Div is floated left</div>

<p style="clear:both;"></p>

</div>


The width of the parent doesn't need to be explicitly set, it can be inherited from the parent's parent. Or even as far as the browser window dimensions.

What happens when the dimensions are based on the browser window, is the floated elements will drop down or move back up as the window is resized.

An important thing to keep in mind when working with floats is that an element's dimensions aren't only its width and height. Border, padding and margins also contribute to its dimensions.

If you have a parent element with a width of 600px but it has 3 floated elements inside with a width of 200px each then they should float on the same line right?

As long as they have 0 border, margin and padding they will sit side by side. When you start adding padding and border things change a bit.

If you have a container that is 600px wide, and 3 floated elements inside each 200px but each has 2px padding and maybe 2px of border, plus say 4px of margin, then one of them will drop down.

100px width + 2px (padding left), + 2px (padding right) + 2px (border left) + 2px (border right) + 4px (margin left) + 4px (margin right) = 116px total * 3 elements is then 648px in a 600px wide element.

Its all in the math.

Next time will look at how to achieve some more interesting layouts using floated elements.