New Posts

Friday, September 30, 2011

Windows 8 Metro Diary: Day 3

The following few posts will chronicle my experience with the newly released Microsoft Windows 8 Developer's Preview, made available as a free download from Microsoft themselves.

Monday September 26th - Friday September 30th 2011

Day 3 is a little different, in fact its a week, since I had less time to play around with it, and less things to talk about, I'll bundle the week together.

After several days of digging around, I found a way to get the developer tools for Metro style apps for the other downloads, So I have in fact started to develop one application. However since Microsoft considers this a breach of EULA I cannot disclose the technique here. Suffice it to say, its simple and straight forward. Which makes it even the more puzzling that Microsoft chose not to include this in all the downloads.

However that does not end the issues. After a few days of development Visual Studio 11 crashed on me and has never come back up. It now crashes every time I try to load it. However there is another version that gets installed which is labeled the Experimental Instance which continues to work correctly. So I'm using that.

I've also had an issue with my DVD-Drive, an LG DVD-RAM drive. Its picked up flawlessly by both my BIOS, and Windows XP in the same machine, but Windows 8 just refuses to see it. I guess I could chalk it up to a glitch in this pre-release version and expect it to be fixed b y the time the actual full release hits shelves. Though its still a bit of a mystery as to why it won't see it. More so considering that it was that drive that was used to install Windows 8 from the burnt DVD.

In any case moving on to my Metro style application, I have to say development is very natural if you are familiar with the languages involved. I chose the HTML 5 and Javascript approach, but there is of course the C++, C# or even Visual Basic alternatives if required. All 4 boil down to a full screen website style interface with the engine behind the app being any of the mentioned languages. Its an interesting concept, that actually works surprisingly well for consumer applications such as image management, social site interactions, games, and other none productive apps. However I don't see office based apps as Word, Excel, financial applications, etc.. making the leap to Metro Style.

I do expect however that we'll see Metro based alternatives, with probably less functionality, but nicer interfaces. A Metro style text editor is inevitable as will be a basic Image editor. Standard every day tools like a basic email client and instant messenger are also, no doubt, in the horizon.

For users with more involved requirements the now called Desktop mode is basically an update to the Desktop of any Windows version prior to this, and in which users will be able to run non metro style apps as they would in older Windows versions. This is where most corporate environments, and more technically oriented users will spend most of their Windows using time.

In the end Metro is clearly aimed at final, home or casual users; by offering a nice interface to their most often used apps, without needing to get into the actual system OS. It turns a PC into a tablet which is what most casual users would want for their regular tasks.

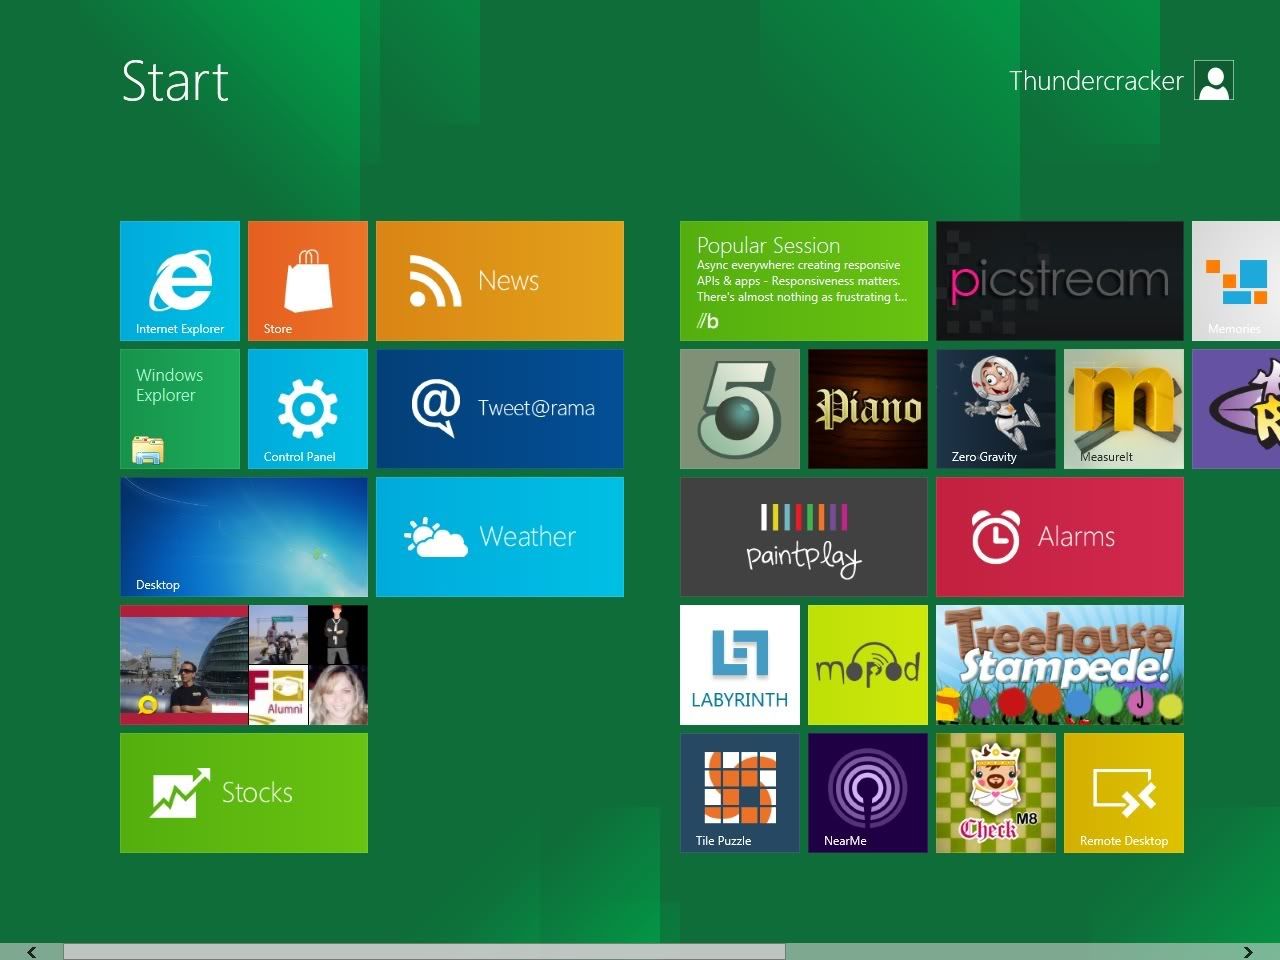
As far as my metro App goes, I developed a pretty basic unit converter. From Metric to English units, and so forth. Its not done yet, but here's a screen shot to tide you over until the next post.

Photobucket

Tuesday, September 27, 2011

Windows 8 Metro Diary: Day Two

The following few posts will chronicle my experience with the newly released Microsoft Windows 8 Developer's Preview, made available as a free download from Microsoft themselves.

Sunday September 25th 2011

Sunday Morning rolls along and I'm thinking great time to see what this puppy can do. I was all set to start delving into the world of Metro Apps when I realized the 32bit version of the Windows Preview I downloaded does not contain the adequate development packages. So off to Microsoft's site to download the Visual Studio 11 Preview package. Well The download is a Smart Installer, though there is a 3 part download you can opt for as well. The complete setup is close to 2GB. So again Another hour or so waiting for it to download.

Once completed it begins to install, it took about another 30 to 40 minutes to finish configuring everything. It was finally done, I could start checking this out, and start getting up to speed in how the Metro Apps work. So Move out to the Start Screen with all the Metro tiles and *whoah!!* 20 Tiles where added to the screen. I realized then and there that the screen simply takes anything and everything from our old trusty Start Menu location and plops it as 150 by 150 pixel tiles.

Anyway, so I run Visual Studio, and all is o.k. It looks interesting. Lets try creating a new project, something simple, a Hello World tile as is customary to do. So I add a single div to the project, (this is a HTML 5 and Javascript Metro App project), configure a few things and try to run and execute to see what it looks like. Well a couple seconds go by, and bam, 2 errors crop up. makepri.exe cannot be found, and the Modern SDK is not there. Well after a lot of digging it turns up, that Microsoft in all its unparalleled wisdom decided to issue only one of the Developer Preview downloads with all the files required to develop Metro Style apps.

The 64bit 4.8GB full download.

Now, I know what you are thinking, how is that a problem, just download that. Well I can't, and many other people can't either. Why You ask? Well I don't have a 64bt computer, so I can't run that. Many people don't have dual layer DVD's to burn, or their drives can't actually burn them. So we choose the alternative: Download the 32bit Windows OS preview, and then install the Visual Studio Preview separately.

However this method leaves you without the essential Metro App development files which is the entire purpose of these previews. I don't understand the logic behind only providing the tools in one of the packages? What's to gain here? I really don't understand. Its like having rollercoaster with a sign that says come all and try it, but once you are inside you can only get the full ride if you have a $20,000 Rolex watch and have been lugging around a very large duffle bag. Everybody else gets just the shortened route.

So that's It for day 2, hopefully day 3 will bring some much needed solutions..

Any comments or questions, feel free to post below.

Sunday, September 25, 2011

Windows 8 Metro Diary: Day One

The following few posts will recap my experience with the newly released Microsoft Windows 8 Developer's Preview, made available as a free download from Microsoft themselves.

Saturday September 24th 2011

We start off with a hefty 2.8 GB download, that's 2.8 Gigabytes of data, as in your standard USB pen drive capacity these days. It took a little less than 2 hours to complete.
After that we need to build the customary Installation media from the download. A simple matter as its an ISO image, a CD/DVD image file which contains all the information needed to burn an installation disc using any number of tools available. I used ISOburner a free safe tool for just such tasks. Once the DVD is done its on to installation. I decided to do this as an actual install rather than a virtual one just So I could get the full experience. So I went into my Hard drive drawer and picked an empty one I knew was operational. 80GB of space should suffice I thought, I don't think I'll be installing many things onto this, and I it will be basically for testing purposes.
So the Install goes similarly to Windows 7 installation, it lets you pick your destination drive, and ipartition it as you see fit. The installation automatically creates a 300MB system reserved partition regardless of your partitioning choices. It deducts the space from your main OS partition. Once complete it proceeds to copy and install files. It took quite a while to install, about 30 minutes in my not so powerful test PC.
Windows,8,metro,sidebar,interface,new
When all is said and done, you are treated to the new Metro Start Screen. Instead of your regular start menu, you get a full screen of what Microsoft now calls tiles. Squares or rectangles that serve as shortcuts for applications and other functions. Several pre-installed apps and games grace the screen, most notably Socialite the Facebook app, and of course IE10 Metro version. (more on this later)
My first task of course was setting up the Internet connection, as Windows did not automatically detect/install my wireless card. Of course you can't really tell what is going on as the interface is aimed at final users, so off the bat we need to dig into the new layout to find the familiar Device Manager. (I wonder If I can add a Device Manager Tile for easy access). Installation of the wireless card was as painless as it has been in previous versions of Windows.
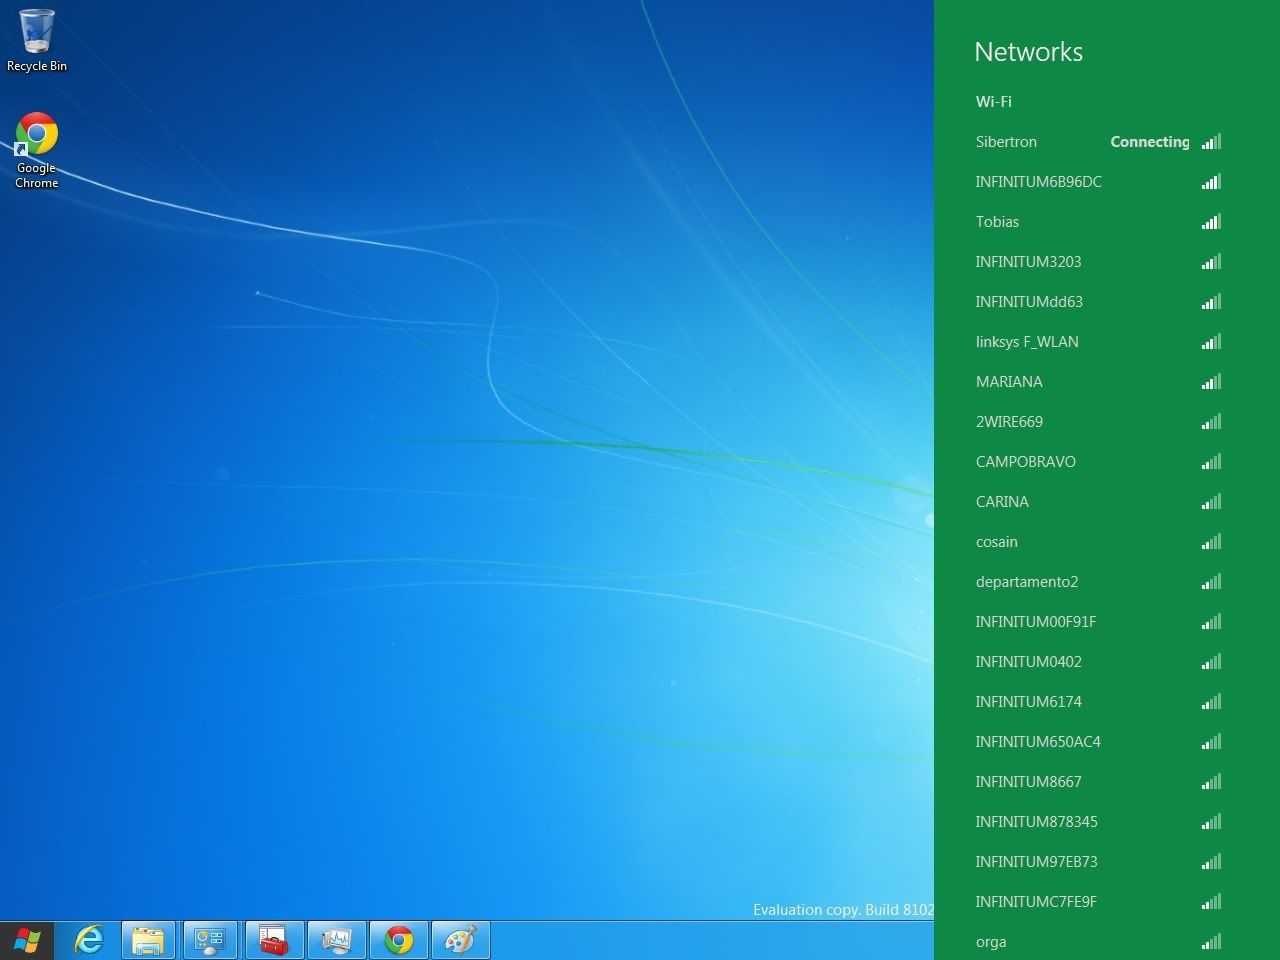
With that done we get a look at the new Wireless network list; a green sidebar, as Microsoft calls it. It offers a very nice, large and crisp font for the network names and the standard bar display for the signal strength. A nice face-lift to what we had been seeing since Vista.
Windows,8,metro,sidebar,interface,new
The next test drive was of course IE10. Now here's were things get interesting, Microsoft has divided the applications into 2 categories: Desktop applications and Metro Style applications. Desktop Applications are your run of the mill apps you've been using in other versions of Windows, they open in standard windows, and can be maximized, dragged around, closed etc... The Metro Style App is the new kind of app that takes advantage of the new Metro Engine and runs full screen, cannot be dragged or moved, or even closed in the regular sense of the word. Its basically a full screen dynamic Web application that runs outside a browser and covers the screen. It can be swiped out of the way, or hidden. When hidden or swiped out of the way the app suspends rather than outright closing.
For me this is a slight drawback, as It means you quickly have many many things running in the background you may not want or need, and with no real dedicated closing mechanism, your are left with only the TaskManager route of closing these applications.
Technically speaking Windows memory manager should close apps you haven't used when running low on memory, however I've never been keen on letting Windows handle the memory usage by itself, I like to be able to close things when I'm done.
Going back to IE10, it does come in 2 flavors Desktop, and Metro. In Desktop mode is very similar to other versions of IE, (8 & 9) so nothing much to comment on there. While in Metro Mode its as explained a full screen app, with the address bar now positioned in a smokey dark gray translucent hideaway bar at the bottom of the screen. No other visible controls are present. When navigating the website the bar disappears for the full screen experience. To bring it back you must right click the screen. This brings up the address/tool bar and the tab/page bar at the top. The Address/tool bar offers your regular forward, back and refresh buttons, along with a search button and a Pin to start button. So you can add your favorite sites to the Metro Start Screen.
The Tab/Page bar at the top shows thumbnails of your currently opened tabs, as well as the option to close them or open new ones. Clicking back in the website makes the bars go away and puts you back into browsing mode.
At the end of day I can see the interface is very much designed for touch based devices; however the mouse and keyboard experience is pleasant enough to be quite usable and satisfying. However I can see corporate environments turning it off, in favor the desktop mode.
Day 2 will see me install a few more applications, and wrangle with a few more pieces of hardware So stay tuned for Day 2 of the Windows 8 Metro Diary. .
Comment, subscribe, ask questions...

Friday, May 20, 2011

Ajax 101

Asycnronous Javascript And XML, the mysterious entity known as AJAX.

What is it? What does it do? In simple terms its a method of connecting a website to a server side script without needing to submit a form, or reload a page.

For years the usual way of getting data from the server was to submit a form with values to be processed by the server which would in turn return the results of its process. This usually slowed down websites considerably, and there was no real time interaction between the user and the website.

Ajax solves this by opening a direct connection to the server, and requesting the data processing without needing to submit a form.

Ajax is composed of 3 main sections:
  • The Javascript that executes the Ajax call
  • The Ajax that calls the server side script
  • The Server side Script that takes the parameters and produces the data to be returned to the website.


The main component of AJAX is the XMLHttpRequest object. This thing does it all. It opens the connection, waits for the results, and then makes them available to JS for any further parsing or usage.

But before we can use that we need our Server Side process. This can be pretty much any script that returns data, and it can be done in pretty much any language the server can execute. PHP, ASP, Coldfusion etc...

For our example we'll be using PHP.

The Server Side Script

The Server Side Script has one important task to accomplish, and that is to produce the results we need. The script should be designed like any server side script, except we don't need full html tags as we are going to deliver this to our Javascript layer for usage in an already established page.

So basically all we want is for our script to output our data. We could include a table structure or some other markup if we require, but only if we don't plan for your JS side to do anything to data, otherwise outputting in usable formats such as comma separated strings, or a JSON object is enough.

For our example script we'll just have a process that takes a value from the POST array and echoes it out in a string.

PHP Script


<?PHP

if(isset($_POST['id'])){

echo "The ID Passed is: $_POST[id]";

}

?>


Javascript and Ajax

No we need a way of calling our server side script, and getting back the results. to do this we will require the XMLHttpRequest object from the JS window object.

We start by defining our request object:

Request Object


var requestObj=new XMLHttpRequest();


We can now use our new object to initiate the call to our server side script. However before we can do that we'll need to make a decision. do we want our call to be synchronous or asynchronous. A synchronous call means the Js stops and waits for the server to complete the processing before continuing on, this effectively makes the website hang and be unresponsive until the call is finished. Ultimately we would only use this if don;t have lots of processing to do and the response would be returned rather quickly.

Otherwise we'll want to use the asynchronous method which as it implies lets the website and all JS functions continue to run while the server process is being executed. This allows the user to keep doing things while the request is under way.

We are going to go for the asynchronous method, so we need to
setup a function to handle the data once it returns. For this we use the onreadystatechange event of our ajax object. onreadystatechange triggers every time the the readystate property changes. The readystate property simply holds the status of our request. We want it to be 4 so the Request is complete. The other values are not relevant in the context of a webpage as you can't actually do anything about them.

We also have to check the status property. The value we want is 200, which stands for "O.K." that means the call to our server side script executed correctly and data was returned. Status has many values that you can check; most are the standard HTTP status codes like the classic 500 Internal Server Error, 404 Not found error etc...

We check for both those values, and if they are 4 and 200 we can proceed to use the responseText value to get whatever our script produced as output.

Request Object and Properties


requestObj.onreadystatechange=function()
{
if (requestObj.readyState==4 && xmlhttp.status==200)
{
var results=requestObj.responseText;
document.getElementByID('myDiv').innerHTML=results;
}
}


We can then use our results to populate anything we need using regular JS calls. In the example above I simply placed everything into a div.

The next part of our Ajax interaction is to call our actual script. We'll use the open() method to define our script address, the method we want to use, and the type of call (synch vs asynch) amongst other things.

The Open method


xmlhttp.open("POST","script.php",true);


The Methods are the same ones used in a From, GET or POST. POST is the better alternative if you plan on sending a lot of data to be processed.

The address of our script is the second value we need to set. the request object is limited to reading scripts form the same domain it originates so you can;t go out and read pages from other websites to mash up into your own site.

We then need to set up our headers. Since we are basically recreating the function of a form, we set it up as such.

Headers


requestObj.setRequestHeader("Content-type","application/x-www-form-urlencoded");


And finally we need to send our parameters to our server side script.

Send Paramters


xmlhttp.send("id=" + value + "&action=list");


The parameters will appear in our POST array inside our server side script. In the case of PHP the $_POST variable.

You can set a string, or you can add values from variables or both like above by using concatenation. "value" is a variable that contains the id we wish to pass. We separate each pair with an ampersand &

With that we are done, we can setup our ajax call to be executed when a button is pressed.

Button Call


Enter ID: <input type="text" id="idbox">

<input type="button" onclick="runAjax();">


With that done, inputing an ID and pressing the bun will run our Ajax function and in turn execute our PHP script without needing to reload the page.

In our next installment we'll be looking at a slightly more complex example, by getting data from a database on the fly.

Working Example


Download the example:

Questions? Comments? Use the comment form.

Wednesday, May 18, 2011

Common Validation Errors

In a previous post i talked about the importance of validation, but I never delved into what types of errors you would commonly encounter. Today we are going to take a look at 3 common errors you encounter when validating.


There is no attribute "xxxx"


Html elements or tags have attributes one can assign to them. things like a name, and ID, a class but sometimes we may try to use an attribute that an element doesn't have. Or an attribute it may have in one particular doctype but not in another.

For instance lets say we are building a form to get user input:

From Code

<form name="MyForm" action="mypage.php" method="POST">

<p>User:<input type="text" name="user"></p>

<p>Password:<input type="password" name="user"></p>

...

</form>


If I were using an XHTML strict doctype in the website that contained this, the error would be something like:


Line 7, Column 12: there is no attribute "name"
<form name="MyForm" action="mypage.php" method="POST">
You have used the attribute named above in your document, but the document type you are using does not support that attribute for this element.


In <!DOCTYPE html PUBLIC "-//W3C//DTD XHTML 1.0 Strict//EN"

"http://www.w3.org/TR/xhtml1/DTD/xhtml1-strict.dtd"> only input elements can have a name. Divs,paragraphs, links etc.. cannot have a name attribute.

Most would think a name is vital to be able to access form elements if you are using JS to validate the form. For XHTML Strict, you only need an ID for the element you wish to access through Javascript.


End tag for "xxxx" omitted, but OMITTAG NO was specified


This one of the more common mistakes simply because its the easiest to over look.

It happens on certain tags such as image, break and any other tag that doesn't require a closing tag to accompany it unlike other tags like divs, links, spans etc...

Closing Tags


<div></div>

<a></a>

<span></span>


----


Self Closing


<img src="">


<br>


<input type="text">


Self closing tags like above require an extra special character to properly close them. the forward slash. In XHTML strict these tags need to be terminated as .../> to be properly closed, otherwise they generate errors. Since Transitional doctypes don't require this, its easy to forget to add them at the end.


document type does not allow element "xxx" here; missing one of a, b, c,d,e,...


This error is more of a nitpicky error, Basically what is says is that whatever xxx is, it cannot be placed wherever it is you have it because it requires something else to contain it. The most common example of this are label tags. Most would assume you can simply add them in front of an input to add a text label to it. XHTML Strict doctypes will barf at it as they require the label to be inside a block level element such as a div or a paragraph.

Wrong


<form ...>

<label>My Label</label><input type="text">

</form>


Right


<form ...>

<p><label>My Label</label><input type="text"></p>

</form>


There are many more errors, some harder to understand than others, however its important to read the provided reasons for the error, as more often than not they contain vital clues to what may be wrong with that particular line.

Tuesday, April 26, 2011

Floating 102

Sop what interesting things can we do with float?

Lets look at a few examples:

Images in Text


When you have a section with text, and you want to have an image in it, you may need to have the text wrap around it so as to not break up the text. By default images will simply break up the text if placed inside, or just sit on top of it if placed before it.

cover


If we want to have the text wrap around the image we need to float it to one side.

CSS


img{
float:left;
}


Here it is in action:


What happens when we have several images to float.

If the are side by side in the html, they'll continue to float left like below:


If would like the to simply drop below eahc other and have the text wrap around them where they end, we simply need to add a clear:float property to out image CSS.

CSS


img{
float:left;
clear:both;
}


It will look like this:


So floats give us nice layout options with images, but what else can it do for us?

Columns


Usually floating is used to create columns in a layout, as you can place divs side by side and fill them with content. Lets say we want a 3 column layout like a newspaper.
Unlike tables, there is no way yet to make floated divs be as high as each other, they'll be as high as the need to be to accommodate their content. As we've seen in previous entries if there's anything floated inside them extra steps need to be taken to make the div correctly wrap around its contents, however in all cases once its wrapped around, it will only be as high as the content requires.

To create the column layout we need to fake the height of the divs, to the observer it will look like they extend down, but in reality the stop where their content ends.

For our 3 column layout here's our basic HTML.

HTML


<div id="wrapper">

<div id="column1">

<h4>Column1</h4>

<p>Content</p>

</div>

<div id="column2">

<h4>Column2</h4>

<p>Content</p>

</div>

<div id="column3">

<h4>Column3</h4>

<p>Content</p>

</div>

</div>


Here's our CSS:

CSS


#wrapper{
width:402px;
background-color:#686868;
color:#DEDEDE;
overflow:hidden;
}

p{
margin:4px;
}

h4{
text-align:center;
}

#column1{
float:left;
width:120px;
}

#column2{
float:left;
background-color:#dedefe;
width:160px;
color:#686868;
}

#column3{
float:left;
width:120px;
}


See it in action:


As you can see the columns appear to match heights, however, if we add a border to the columns on the outside (column 1 and 3) you'll notice they end where their content ends, the rest is an optical illusion caused by the wrapper's background which is gray.

This works for 2 or 3 columns in much the same way, if you need to have more columns then it gets much more complex. We'll talk about multi column layouts in a future article. For now know you can do this for up to 3 columns.

Sunday, April 17, 2011

Floating

The ever present, and most often misused property in CSS after of course position.

Floating takes an element, and pushes it to one side of its container or parent element. It takes the element out of the document flow, so it no longer affects its parent's dimensions directly.

What this means is the floated element while still under its parent's general jurisdiction, no longer has any effect on it. If the parent has no height defined then the it will simply collapse, and the floated element will just float above it.

example:

HTML


<div style="width:300px; border: 2px solid red; background-color:#dedede;">

<div style="float:left; background-color:#464688; width:160px; height:200px; color:#dedede;">This Div is floated left</div>

</div>


See that red line? That's the parent div that collapsed when I floated the inner div.
As said before, floated elements do not contribute to their parent's dimensions.

To resolve this you can do 1 of two things that will be cross browser compliant.

Add an overflow property to the style of the parent div, or add an extra clearing element to clear the float from the inner div.

Adding overflow:


HTML


<div style=" overflow:hidden; width:300px; border: 2px solid red; background-color:#dedede;">

<div style="float:left; background-color:#464688; width:160px; height:200px; color:#dedede;">This Div is floated left</div>

</div>


Any type of overflow will accomplish the same result, however :hidden is better if you don't want to have disabled scrollbars, or just a tiny amount of useless scrolling in some browsers.

Adding a Clearing Element


HTML


<div style="width:300px; border: 2px solid red; background-color:#dedede;">

<div style="float:left; background-color:#464688; width:160px; height:200px; color:#dedede;">This Div is floated left</div>

<p style="clear:both;"></p>

</div>


Adding an empty element in this case a paragraph element with a style consisting only of clear:both will clear, or reset the floating, and make the container wrap around the floated elements. It looks the same as the overflow method, but has a small caveat. It may cause an extra space to be present, if you have margin or padding applied to the element that is clearing the float.


This is all fine and dandy when there's only one floated element, what happens when you have 2 or 3 or more floated elements. Here's where CSS gets interesting.

Think of a cardboard box for a moment, and imagine you want to place place X amount of objects side by side on one side of the box. You can keep placing them as long as you have room inside the box. Once you exceed the boxes width, you have to move the object "under" the other objects and start a new row.

The same happens in a div with floated elements. When the total width of the objects inside exceeds the the parent's width they drop down. The direction they drop is based on the direction they are floated. If they are floated left, they drop down and move all the way to the left, if they are floated right they'll move to the right.

HTML


<div style="width:300px; border: 2px solid red; background-color:#dedede;">

<div style="float:left; background-color:red; width:70px; height:200px; color:#dedede;">This Div is floated left</div>

<div style="float:left; background-color:green; width:90px; height:200px; color:#dedede;">This Div is floated left</div>

<div style="float:left; background-color:blue; width:60px; height:200px; color:#dedede;">This Div is floated left</div>

<div style="float:left; background-color:yellow; width:120px; height:200px; color:#dedede;">This Div is floated left</div>

<p style="clear:both;"></p>

</div>


<hr>


<div style="width:300px; border: 2px solid red; background-color:#dedede;">

<div style="float:right; background-color:red; width:70px; height:200px; color:#dedede;">This Div is floated left</div>

<div style="float:right; background-color:green; width:90px; height:200px; color:#dedede;">This Div is floated left</div>

<div style="float:right; background-color:blue; width:60px; height:200px; color:#dedede;">This Div is floated left</div>

<div style="float:right; background-color:yellow; width:120px; height:200px; color:#dedede;">This Div is floated left</div>

<p style="clear:both;"></p>

</div>


The width of the parent doesn't need to be explicitly set, it can be inherited from the parent's parent. Or even as far as the browser window dimensions.

What happens when the dimensions are based on the browser window, is the floated elements will drop down or move back up as the window is resized.

An important thing to keep in mind when working with floats is that an element's dimensions aren't only its width and height. Border, padding and margins also contribute to its dimensions.

If you have a parent element with a width of 600px but it has 3 floated elements inside with a width of 200px each then they should float on the same line right?

As long as they have 0 border, margin and padding they will sit side by side. When you start adding padding and border things change a bit.

If you have a container that is 600px wide, and 3 floated elements inside each 200px but each has 2px padding and maybe 2px of border, plus say 4px of margin, then one of them will drop down.

100px width + 2px (padding left), + 2px (padding right) + 2px (border left) + 2px (border right) + 4px (margin left) + 4px (margin right) = 116px total * 3 elements is then 648px in a 600px wide element.

Its all in the math.

Next time will look at how to achieve some more interesting layouts using floated elements.